Tuesday, May 31

Gina K. Designs May Inspiration Blog Hop Day 2: Dreams and Birthday Bash

Hello my friends! Welcome to Gina K. Designs May Inspiration Blog Hop Day 2. Are you excited to see what we have for you today? I am! For today's hop we have 2 wonderful sets: "Dreams" by Tami Mayberry and "Birthday Bash" by Rupa Shevde.

The Dream, The Hope, The Reality Card:

Directions:
  • Make card base from Ivory Cardstock.
  • Cut  apiece of Patterned Paper (Butterfly Garden from Pink Paislee), ink all edges. Adhere it to a piece of Grass Green CS. Add a couple of strips of PP, for the top one punch bottom border, ink all edges and add stitches. Adhere it to card.
  • Stamp image and sentiment on Ivory Cardstock in Vintage Photo Distress Ink. Die-cut and emboss image using Rectangle Nestabilities. Adhere it to card with foam tape.
  • Add Clear Rhinestones to top border and bow to card.

Card Recipe:
  • Cardstock: Ivory, Grass Green (GKD)
  • Paper: Butterfly Garden (Pink Paislee)
  • Stamps: Dreams (GKD)
  • Ink: Vintage Photo (Ranger)
  • Embellishments: Clear Rhinestones, White Ribbon (GKD)
  • Accessories: Border Punch (Fiskars), Rectangle Nestabilities (Spellbinders), Sewing machine, Sponges. Foam tape, Scor-tape.
Birthday Wishes Easel Card

Directions:
  • Die-cut 3 pieces of Red Hot CS using Eyelet Circle Nestabilities (Biggest die).
  • Stamp image on White CS in Memento Tuxedo Black, color image with Copic Markers. Die-cut, emboss and stencil it with Circle Nestabilities. Adhere it to 1 of the Red Hot Circles.
  • Die-cut, emboss and stencil a second piece of White CS using Circle Nestabilities. Adhere it to second piece of Red Hot CS.
  • Stamps sentiment on White CS. Die-cut and emboss it using Fancy Tags Die. Adhere it to card using foam tape.
  • Take your last piece of Red Hot CS, Score it exactly in half, the score it at 1", fold it and adhere to card to create the easel part. (See picture).
  • Add bow and stickles to cupcake and turtle.

Card Recipe:
  • Cardstock: White, Red Hot (GKD)
  • Stamps: Birthday Bash (GKD)
  • Ink: Memento Tuxedo Black (Tsukineko)
  • Embellishments: Pink Ribbon (GKD), Star Dust Stickles (Ranger)
  • Accessories: Circle Nestabilities, Eyelet Circle Nestabilities, Fancy Tags (Spellbinders), Copic Markers, Fabri-tac, Scor-tape, Foam tape.
All the products in bold can be found at Gina K. Designs Store.

Are you ready for  more inspiration? Check out the DT blogs listed below. Don't forget to leave a comment for your chance to win!!
Have fun hopping!
Thanks so much for stopping by.

Saturday, May 28

Wee Memories Challenge # 58: Inspired by

Hello my friends! Welcome to another Wee Memories Scrappy Saturday Challenge, this week our challenge is "Inspired by" and it is sponsored by May Arts.


Prize: One lucky winner will get a Ribbon Prize Pack!

I got my Inspiration from this picture I saw at Pinterest, have you checked it yet? Oh my! Pinterest is addictive, I am trying to spend only 30 minutes, but sometimes time flies, LOL.

Image from Pinterest

and this is my card. I got inspired by the pretty colors, don't you love this picture?

Directions:
  • Make card from Ivory Cardstock.
  • Embosses a piece of Ivory Cardstock using Textile embossing folder, ink all edges and mat this piece with Chocolate Brown Cardstock. Add zig zag stitches and adhere it to card.
  • Stamp image and sentiment on Ivory cardstock in Vintage Photo Distress Ink, Die-cut, emboss and stencil it with Label 8 Nestabilities. Adhere it to card with Foam Tape.
  • Add pearls and ribbon.

Card Recipe:
  • Cardstock: Ivory, Chocolate Brown (Gina K. Designs)
  • Stamps: Vintage Chic Stamp Tv Kit (Gina K. Designs)
  • Ink: Vintage Photo Distress (Ranger Industries)
  • Embellishments: Pearls. Butter Ruban (American Crafts).
  • Accessories: Textile embossing folder (Provo craft), Label 8 Nestabilities (Spellbinders), Sewing machine, Fabri-Tac, Foam tape, Scor-tape.
The deadline for this challenge is 11.59pm PST on Friday, June 3,  2011. For more details, some fabulous design team inspiration and to link up your projects, click here

Friday, May 27

Gina K. Designs May Inspiration Blog Hop: Vogue Vases and Border Bling

Hello my friends and welcome to Day 1 of Gina K. Designs May Inspiration Bog Hop. Today we are showcasing two wonderful sets: Vogue Vases illustrated by Theresa Momber  and Border Bling illustrated by Melanie Muenchinger.

Here are the projects I have for you today.

Vogue Vases:

Directions:
  • Make card base from Ivory Cardstock.
  • Emboss a piece of the new "Just Peachy" Cardstock using Swiss Dots, ink all edges and adhere it to card.
  • Cut a strip of Just Peachy CS, punch side borders, emboss the inside using one of the Organic Flourish Borders, ink all edges and mat it with a piece of Ivory CS. Tie on Ribbon and adhere it to card.
  • Stamp image on Ivory CS, vase border in Brown Ink and Leaves in Certainly Celery. Stamp vase in Tea Dye Ink. Stamp flower on patterned Paper (Butterfly Garden), cut them out, ink all edges and glue them to card. Add nits of Green Copic Marker to leaves.
  • Die-cut, emboss and stencil image with Rectangle Nestabilities and adhere it to card with foam tape.
  • Add little pearls to flowers and Crystal Lacquer to Vase.


Card Recipe:
Border Bling:

Directions:
  • Make card base from White CS.
  • Emboss a piece of White Cardtsock using Textile Embossing folder, Adhere it to card.
  • Adhere a strip of Metallic Silver CS.
  • Die-cut and emboss a piece of White CS using Oval Nestabilities. Stamp sentiment and adhere it to card.
  • Stamp Oval Bling on White CS in London Fog Ink. Create a frame using Oval Nestabilities and Beaded Oval Nestabilities. Adhere it to card with foam tape, add Silver Liquid Pearls.
  • Add embossed flowers and add Silver Liquid Pearls.
Card Recipe:

Classy & Fabulous Tag.

Directions:
  • Create a tag. I die-cut this one using George & Shape Basic Cartridge and a Cricut Machine.
  • Die-cut Patterned Paper as well. Distress and ink all edges. Adhere it to tag and add stitches.
  • Stamp sentiment and border bling onto Patterned Paper. Add Ruby Red Liquid Pearls.
  • Tie on ribbon, add crocheted flower, button and make a bow.
  • Add jute twine.

Tag Recipe:
  • Cardtsock: Kraft (GKD)
  • Paper: Butterfly Garden (Pink Paislee)
  • Ink: Vintage Photo Distress (Ranger)
  • Embellishments: Ruby Red Liquid Pearls, Pink Seam Binding Ribbon (etsy), Crocheted flower (Handmade), Pink Button (GKD), Jute Twine (GKD)
  • Accessories: Cricut, George and Shape Basic cartridge, Sewing machine, Scor-tape, Glue dots.
Ready for more inspiration? Visit each of the DT blogs listed below and don't forget to leave a comment for your chance to win too!!
Thanks for stopping by!
Have fun hopping.

Thursday, May 26

Today is the night!! Gina K. Release Party and a sneak peek.

We are very excited to extend an invitation to Gina K. Designs May Release Party. We have a fun evening planned for you - chatting, prizes, challenges, stamp sets reveal, design team shares, and most importantly, at the end of the party you will be able to go shopping!

If you came from Janice's blog, you're at the right place. If not make sure to head over to StampTV where you will find a list of all those participating in today's hop.

Here's a peek at one of the cards I will be sharing at the party.


Hope to see you at the party, here are all the details:

Head on over to Donna's blog to see what sneak peek she's sharing with you today and see you back here tomorrow for the beginning of our four day Inspiration Blog Hop series for May!

Have a great day!

Wednesday, May 25

Altered Journal

Hello my friends! I have a non-card project for you today. I have to confess that I am a 100% cardmaker, but once in awhile I like to do something a little different.
Few days ago I found this journal at Michael's on the $ bin, good deal!, so I decided to change the front an this is the result :) I really like it, maybe next time I will do something with more layers, LOL

Products used:

Directions:
  • Cut a piece of Red Cardtsock: 4 5/8" square. Mat it with a piece of Patterned Paper and add stitches.
  • Glue piece to journal with Dry Zip Glue. Add pearls to tops sides.
  • Stamp image on White Cardstock in Tuxedo Black Ink. Color it wit Copic Marker and Pencils. Die-cut, emboss and stencil it with Circle Nestabilities. Mat this piece with a Red piece previously die-cut with Eyelet Circle Nestabilities. Adhere it journal.
  • Add Ribbon.
  • Add some Glitter on roses and leaves.
Hope you like it!
For more inspiration using Heartfelt Creations Stamps, please visit the HC Blog!! Lots of eye candy, just for you.

Tuesday, May 24

Psalm 119:105

Hello my friends! Hope you are having a great day/night wherever you are. Today I started my day computer-less, geeshhhh my computer sometimes drives me crazy, the funny thing is my husband is the only one who understands it, LOL, I have told my husband the computer doesn't love me, anyway, the husband finally fixed it and here I am.

Today I have a masculine card using Shining Light set from Sweet'n Sassy Stamps.

Directions:
  • Make card base from Kraft Cardstock.
  • Emboss a piece of Ocean Mist CS and ink all edges. Adhere it to card.
  • Tie on jute and make a knot.
  • Stamp image and sentiment on White Cardtsock in Memento Tuxedo Black. Color image with Copic Markers.
  • Die-cut images using Rectangle Nestabilities, emboss and stencil as well.
  • Adhere them to card

Card recipe:
  • Cardstock: Kraft, Ocean Mist, White (GKD)
  • Stamps: Shining Light (Sweet'n Sassy Stamps)
  • Ink: memento Tuxedo Black, Tea Dye, Copic Markers.
  • Embellishments: Jute twine.
  • Accessories: Cuttlebug Embossing folder, Rectangles Nestabilities, Scr-tape, Foam tape.
Hope you like it.
Have a great day!!

Saturday, May 21

Scrappy Saturday Challenge #57: Sponsored by "Market Street Stamps"

Hello my friends! Welcome to another Wee Memories Scrappy Saturday, this week our sponsored is "Market Street Stamps", their stamps are adorable and I really love the clear, photopolymer, peach-tinted stamps, super cool to work with!


The challenge for this week is "Stamp it!, create a card or project using rubber or clear stamps! Easy peasy, we all have some around :)

The prize: A gift Certificate to the "Market Street Stamps" (You are going to  love it!)

For my card, I worked with Cheep Talk set, these birds are so cute!


The birds were colored with Copic Markers, I added some Star Dust Stickles to the leaves. The Patterned Paper is For the Record by Echo Paper. I added 6 Light Green Rhinestones :) I love all the bling.

The deadline for this challenge is 11.59pm PST on Friday, May 27,  2011. For more details, some fabulous design team inspiration and to link up your projects, click here
I am submitting this card:

Hope you like!
Have a great day.

Wednesday, May 18

Thinking about you, wonderful person

Hello my friends! Hope you are having a great day! Today I have a couple of pretty cards using some of the new stamps from Heartfelt Creations :)

To a Wonderful Person:

Products used:

Directions:
  • Make card from Yellow Textured Cardtsock. A2 size.
  • Punch Green and Pink Textured Cardstock using Lace Border Punch. Adhere them to card.
  • Cut a piece of Patterned Paper and adhere it to card.
  • Stamp sentiment from HCPC 3389 Sentiments For Mom Pre-Cut Set on White cardstock in Real red ink. Die-cut, emboss and stencil piece with Oval Nestabilities. Stencil it with Daffodil Delight Ink.
  • Die-cut Butterfly from HCD 702 Decorative Butterfly-Border Dies, ink all borders and adhere it to card with Zots glue dot. Add pearls to butterfly.

Thinking about you

Producst used:
Directions:
  • Make easel card from Brown Cardstock. Cut a piece 4.5" x 9", Scor it at 4.5", 6.75".
  • Cut a piece of Brown Cardstock 4.5" square. Adhere it to front of card.
  • Cut (2) Dark Pink CS: 4.25" x 4.25; (2) Patterned Paper: 4" x4". Ink all edges and mat to Dark Pink CS. Add staright stitches.
  • Front card: Stamp image from HCPC 3392 Bella Rose House PreCut Set on White CS in Memento Tuxedo Black Ink, color it with Copic Markers. Die-cut image with Square Nestabilities, emoss and stencil as well.
  • Tie on ribbon and add image. Adhere it to card. Add Pearls and Gold Gala Glitz.
  • Inside card: Mat cardstock and PP, ink all edges of PP and add straight stitiches. Stamp sentiment from HCPC 3383 Cardinal Posy Branch PreCut Set on White Cardstock in Vintage Photo Distress Ink. Die-cut, emboss and stencil it with Fancy Tags Dies. Adhere it to card with Zots Glue Dots
You can visit the Heartfelt Creations Blog for more inspiration and wonderful project from the DT!

Have a great day!!

Tuesday, May 17

Happy Father's Day

Hello my friends! Hope you are having a great day. Things here finally are settling them down and I feel much better. I have a pretty "Father's Day" card for you today,  I used Shining Light set from Sweet'n Sassy Stamps. This set is fantastic!!

Happy Father's Day!

Directions:
  • Make card base from Kraft Cardstock. A2 size (4.25" x 5.5")
  • Cut a piece of Cardtsock and Patterned Paper, distressed all edges of PP. Mat it with CS and add stitches.
  • Add Jute Ribbon .
  • Stamp image on White CS in Tuxedo Black Ink. Color image with Copic Markers. Die-cut, emboss and stencil it with Rectangle Nestabilities. Add Jute twine on left corner. Adhere it to card with foam tape.
  • Stamp sentiment on White CS in Tuxedo Black ink. Die-cut, emboss and stencil it with Label 8 Nestabilities. Adhere it to card.

Card Recipe:
  • Cardstock: Kraft, Ocean Mist, White (Gina K. Designs)
  • Paper: Road Map (October Afternoon)
  • Stamps: Shining Light (Sweet'n Sassy Stamps)
  • Ink: Memento Tuxedo Black (Tsukineko), Bashful Blue (SU), Vintage Photo Ranger Industries)
  • Embellishments: Jute Ribbon, Jute twine (GKD)
  • Accessories: Rectangle Nestabilities, Label 8 Nestabilities (Spellbinders), Sewing machine, Sponges, Copic Markers.
I am submitting this card to:
  1. Sweet' Sassy Sketch Blog: Sketch.
  2. Cute Card Thursday: Distressing.
Hope you like it.
Have a great day!

Monday, May 16

New desk!

Hello my friends! I hope you are having a great day! Here we have had rain, rain and more rain that it was not funny. Luckily, I won't need to water my garden for a couple of days at least.
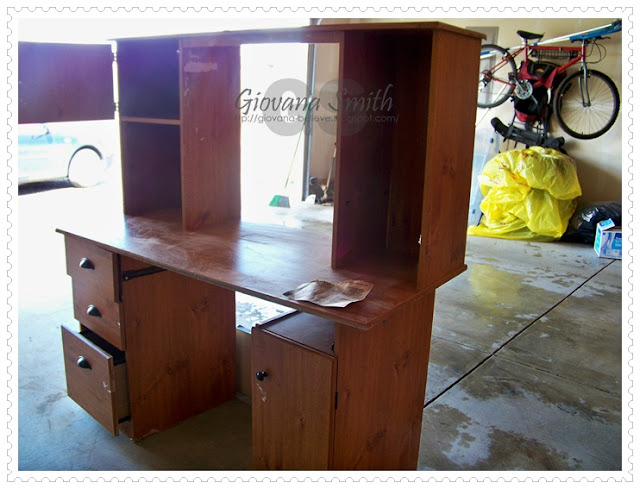
Today, I don't have a card for you, but I want to show my new desk, well my new re-furnished desk :) I got this computer desk at a yard sale for $8.00!! As soon as I saw it I knew it could work great for me. So I painted it white and the antique desk that I was using is part of my DD stuff ;) This desk has a lot more room and I am very happy with the results. I don't have a lot of stuff, but now everything has its own place.

Here few pictures :)

Old desk:
 My craft area before:
 My craft are after:
Have a great day!!
Giovana

Saturday, May 14

Scrappy Saturday Challenge # 56: SMR Stickers

Hello my friends! Welcome to another Wee Memories Scrappy Saturday Challenge, this week our sponsored is SMR Stickers and the challenge is to create a card or project using Stickers/Rub-ons.


So this is the card I made for you today. The image and sentiment are stickers from our Sponsor, they so easy to work with!

You are the sweetest!

Directions:
  • Make card base from Pink cardstock.
  • Die-cut a piece of Red and Green cardstock using Eyelet Circle and Circle Nestabilities.
  • Adhere cupcake sticker onto White cardsock and cut it out.
  • Mount this with die-cut pieces using foam tape.
  • Adhere sentiment and border sticker to card.
  • Add buttons and twine.
  • Add Star Stickles to cherry and sprinkles.
Card Recipe:
  • Cardstock: White (GP), Pink (Recollections), Red Hot, Grass Green (Gina K. Designs)
  • Image and sentiment: Cupcake, Strawberry (SMR Stickers).
  • Embellishments: Red Buttons (GKD), Pink Sorber twine (The twinery), Star Dust Stickles (Ranger)
  • Accessories: Eyelet Circle Nestabilities, Circle Nestabilities (Spellbinders), Foam tape, Glue dots.
The deadline for this challenge is 11.59pm PST on Friday, May 20,  2011. For more details, some fabulous design team inspiration and to link up your projects, click here

I am submitting this card to CAS-ual Fridays: Buttons and Twine

Have a great day!!

Friday, May 13

CSS Alumni "Sketch Blog Hop"

Hello my friends! Welcome to another CSS Alumni Blog Hop. This time, we have a beautiful sketch by our very talented Melissa Cash.


Now, if you are here from Joy's blog you are in the right place, if not please start from StampTV so you don't miss any of the wonderful creations :)

Here is my take on the sketch.

Directions:
  • Make card base from Kraft Cardstock using Circle Eyelet Nestabilities.
  • Die-cut a piece of patterned paper using Circle Nestabilities, emboss and stencil it as well.
  • Die-cut, emboss and stencil a piece of White Cardstock using Oval Nestabilities, Adhere it to card with tape.
  • Stamp image on White Cardstock in Memento Tuxedo Black, color it with Prismacolor Pencils. Cut out image and add Stickles.
  • Stamp sentimento on White CS in Vintage Photo Distress Ink. Die-cut, emboss and stencil it using Fancy Tags Nestabilities. Cut out right side of tagd and adhere it to card with Foam tape.
  • Adhere cut out image to card.
  • Add 3 Medium Nailheads and bow.

Card recipe:
Now, hop over to Deb"s blog and see what she has done for us today.

Make sure to leave a comment as you hop along because on Tuesday morning (May 17th), we will randomly choose one of the comments from all the blogs who will get a stamp set of their choice valued up to $24.95!

Have fun hopping!
Thanks so much for stopping by.

Thursday, May 12

Sew Fun GKDT Blog Hop

Hello my friends! Hope you all are having a great day. The members of Gina K.'s Design Team have come together to host a hop with sewing as the center theme. Along the hop you will find a variety of sewing techniques from hand sewing to faux sewing!

If you came from Emily's blog,you're at the right place. If not make sure to head over to StampTV where you will find a list of all those participating in today's hop.

Here is the card I made. I used straight and zig zag stitches on my card :)

Directions:
  • Make card base from Kraft Cardstock. A2 size.
  • Cut a piece of Patterned paper (Butterfly Garden Collection), ink all edges, mat this with a piece of Ocean Mist cardtsock. Add zig zag stitches.
  • Tie on ribbon.
  • Ruffle with lace and adhere it to card.
  • Stamp sentiment onto foam label frame in Vintage Photo Distress Ink.
  • Stamp bird on Ivory Cardstock in Vintage Photo Ink, cut it out and adhere it to card with foam tape. Add Stickles.
  • Add Gold Nailheads.


Card Recipe:
Head on over to Janice; to see what she's sharing with you today!

Have fun hopping!
Hope you like my creation :)

Tuesday, May 10

It's Release time! Bella Rose Collection is Here!!

Hello my friends! Hope you all are having an awesome day! Today is the day!! The beautiful Bella Rose Collection is finally here. The Bella Rose Collection features 8 new PreCut Stamp Sets that coordinate with a new exclusive Heartfelt Creations die, manufactured by Spellbinders.

So, for today I am featuring 2 new set from this collection.

It's your Birthday

Products used:
Directions:
  • Make card base from White cardstock, size 4.25" x 5.5". Die-cut a beaded oval, emboss and stencil it as well, adhere it to card.
  • Die-cut a piece of Patterned Paper from Butterfly Garden Collection (Pink Paislee), emboss and stencil it with Oval Nestabilities. Adhere it to card with foam tape.
  • Stamp Rose from HCPC3394 Classic Bella Rose Pre-Cut Set on White Cardstock in Versamark ink, add Gold embossing powder and heat it up. After it cools off, die-cut image using Bella Rose Die. Adhere image to card with foam tape.
  • Stamp image on White Cardstock in Vintage Photo Ink, die-cut, emboss and stencil it with Oval Nestabilities.
  • Die-cut a piece of Pink cardstock using Border die, adhere it to card.
  • Tie on ribbon.

Special-Tea Card

Products Used:
  • HCPC 3393 Tea with Bella Pre-cut Set
  • Other: Cardstock: Coredinations (Katydid, Rose embroidery); White (GKD); Ink: Memento Tuxedo Black, Prismacolor Pencils: 911, 912, 922, 926, 937, 941, 946, 904); Star Dust Stickles; Pearls, Yellow, Satin Ribbon, Butterfly Garden Patterned Paper (Pink Paislee), Zip Dry Paper Glue.
Directions:
  • Make card base from Katydid Cardstock, 5.25" square.
  • Mat a piece of Rose Embroidery Cardstock (5" square) and Patterned Paper, ink alle dges on Patterned Paper and add stitches.
  • Stamp image on White Cardstock in Memento Tuxedo Black, color it with Prismacolor Pencils (911, 912, 922, 926, 937, 941, 946, 904). Add stickles to rose and leaves.
  • Mat image piece with Rose Embroidery Cardstock, ink all edges on image piece, add stitches. Distress all edges.
  • Punch out side right side of image piece, add Yellow Ribbon and adhere it to card.
  • Add Pearls.
  • Inside: Cut a piece of 4.75" square white Cardstock, add a strip of patterned paper, ink all edges. Stamp sentiment and adhere it to card

Would you like to win this wonderful collection? Leave a comment here on this post and also on the Heartfelt Creations blog, you can visit also all the DT blogs for more chance to win, on May 17 one lucky person will win the entire release valued at $149.99. The winner will be announced on the HC blog on May 18.

Have fun hoping!
Have a great day!!

Monday, May 9

Pretty Bethany

Hello my friends! Hope you are having a great day! I have been really busy and I am looking forward to some relaxing summer time! LOL. DD is only 1o lesson away to finish her school year and we are so excited! I get my summer break too :) I have lots of plans for this Summer that I can't wait to start.
Anyway, today I have another card using Picking Flowers Bethany! Isn't she adorable :) My daughter loves her too, she told me we should name one of the wild bunnies we have around "Bethany", I think it is a good idea :)

This card is very simple and I hope you like it.

 Directions:
  • Make card base from White Cardstock.
  • Punch out flower border onto Patterned Paper and adhere it to front card. Tie on ribbon.
  •  Die-cut yellow cardstock using Eyelet Circle Nestabilities. Adhere it to card.
  • Stamp image on White Cardstock in Memento Tuxedo Black. Color image with Copic Markers.
  • Die-cut and emboss image using Circle Nestabilities. Adhere it to card with foam tape.
  • Add Stickles to flowers.
  • Stamp sentiment in White CS in Vintage Photo Distress Ink. Die-cut, emboss and stencil it using Label 8 Nestabilities. Adhere it to card. Add yellow paper flower.

I am submitting this card to:
Hope you like it!
Have a fantastic Day!

Sunday, May 8

Happy Mother's Day!

Hello my friends! I wish you all are having a great Mother's Day! full with blessings.

I lost my mom almost 25 years ago and I miss her every single day. I know she lives in a precious and wonderful place, but I have my days when it hits more and today it is one of those days.

So, for you my wonderful friends I made this card, enjoy your day :)


The saying is for the new collection from Heartfelt Creations, this set is called Sentiments for Mom


Hope you have a great day!
God bless you all
Giovana