Thursday, April 27
Triangle Turnabout Fun!!
Hello friends!! Today is week 3 as a guest designer for Concord & 9th! I have to be very honest and tell you that I have loved every single minute of it, the products are great and the possibilities are endless, today I am mix matching few sets form the new collection and also one from last year, but amazingly beautiful as well.
Let's start with this card, I actually visualized it before I made it, you know, one of those days that you had a dream and you couldn't wait until it was made and ahhhhhhh moment, yeah it looks like your dream, LOL.
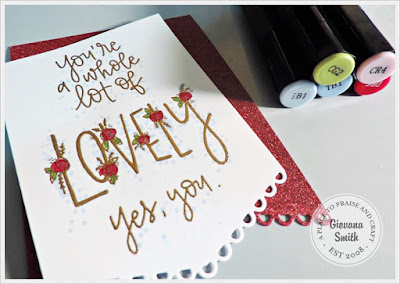
So, I started die-cutting the glitter red and white cardstock with the new Select-A-Size Edge dies. Then I stamped the images from "Lovely" set on the white piece in Versamark Watermark and added Gold Embossing powder, then colored the little images and added the dots with Spectrum Noir markers: IB1, TB1, DR5, CR4, CG2.
Then, I cut a piece of black shimmering cardstock (5.25" x 5.5") and stamped the wonderful "Triangle Turnabout" set using my MISTI in White Pigment, then set it aside to dry or use your heat tool to speed the process. After the pigment was dried, I added a piece of red mirror cardstock and stitched all the layers together.
Finally, I embellished the card with few color drops.
And this is how the card looks like, front side.
Another view.
Concord & 9th products used:
=====================================
Now, a pretty feminine birthday card!! I have another confession, this beautiful Strawberry Slash Cardstock was my last piece and I was seriously hoarding it, LOL, I wish SU could bring it back, please SU, with a cherry on top? {wink, wink}
OK, I made this card for my hairdresser, she is an amazing lady, I love her very much, plus she is a sweet neighbor and she has 2 adorable kids, very polite and well behaved, that's a plus!! anyway, her birthday is tomorrow and she found out not too long ago I made cards (thanks to Instagram) so this is for you Brandi!!
For this card I stamped the Triangle Turnabout on a piece of Strawberry Slash Cardstock (SU retired) I used Versamark Watermark and white and gold embossing powder. Then, I stamped the flower from You are enough set on a piece of vellum in Versamark Watermark and added gold embossing powder and colored it with Spectrum Noir Sparkle. Also stamped the sentiment from Many Mandalas Set on a piece of white cardstock in JetBlack Ink. I die-cut the image (with a piece of white cardstock underneath) and the sentiment using the new Select-A-Size Edge Dies, then added them to the background and added zig-zag stitches. Under the background piece I added a piece of Kraft cardstock and added stitches. Finally, embellished the card with few sequins.
A close up of the shimmery image and gorgeous background.
Don't you love the white and gold embossing on the strawberry slash cardstock? I do!!
Concord & 9th products used:
Thanks for reading this long post, I really hope you like both cards!
Have a fantastic day!
Wednesday, April 26
Cherished moment
Hello friends!! Hope you all are having a fantastic day! Sorry, I have been MIA, I am working hard behind the scenes for the next HSN show!! Crafter's Companion is bringing a whole new stuff, if you are on Facebook, please follow our the Crafter's Companion page and also the event with lots of sneak peeks.
But for now, let me show you a card I made with the new "Rustic Cottage" collection, this collection is beautiful with a lot of vintage style. The papers in this collection are dreamy!!
Love how this card turned out. Entering this card to "Simon Says Wednesday Challenge: Anything goes"
Thanks so much for stopping by!
Friday, April 21
My Sweet Petunia and Sugar Pea Swap Hop
Hello friends!! Welcome back to another fun collaboration blog hop between the My Sweet Petunia and Sugar Pea Designs!
Leave a comment on each blog for your chance to win a MISTI (Winner's choice of an Original or a Mini) from My Sweet Petunia or (2) $25 gift certificates Sugar Pea Designs
The Misti winner will be announced on the My Sweet Petunia blog on April 28th.
Sugar Pea Designs winners will be announced on the Sugar Pea Designs blog on April 28th.
Let me show you the project I created. I started cutting a piece of vellum, big enough to stamp this cute girl from What's Poppin? set, I used my MISTI and Creative Corners too.
Just kept the image in place and started coloring the image with markers.
I added the vellum panel to a 4.75" x 4.75" piece of White cardstock and added stitches, then stamped the pop corn images in light brown ink. Added the white cardstock panel to a piece of patterned paper and added stitches all around. Finally I stamped the sentiment on white and red shimmer cardstock and add it to card with foam tape.
Card size is 6" square.
Blog Hop List:
Hope you like it!
Have a fantastic time hopping.
Thursday, April 20
Mandala Love
Hello friends!! How are you doing today? Hope your day is exciting and beautiful! Today, I am showcasing more stamps and dies from Concord & 9th. This time I am using the Many Mandalas Stamps and dies.
Love this set and I wanted to create something a little different, so these are the 2 cards I created. the first one is a 6" x 6" card and the second one is a standard A2 card. Both are very easy to make, here are the details:
Happy Birthday Card:
- Create a card base from White Cardstock. 6"x6" card.
- Cut a panel from Rose Pearl Shimmering Cardstock 5.5" square.
- Cut a panel from Coastal Pearl Shimmering Cardstock 5.25" square. Stamp the first and 3rd Mandala image in Versamark Ink and then add White embossing powder and heat set. After that, die-cut the mandala.
- Stamp the little flower from the set on Vellum cardstock in Versamark and add gold embossing powder, then heat set. Cut the flowers with scissors. and set aside. After they cool off, color them with a marker, here I used a red marker.
- Stamp the sentiment on a piece of vellum in versamark watermark and gold embossing powder, then die-cut it with a die from the set.
- Adhere panels together, add foam tape to mandala image and add it to card base. Glue all little flowers around and adhere the sentiment.
- Finally add sequins and pearls, and gold tape around the edges.
Wishing you Card:
- Create a card base from Kraft Cardstock. A2 size.
- Stamp Mandala, flower and leave images on a piece of paper (here I used the Concord &9th paper, not available right now) in Versamark Watermark Ink and add Gold Embossing powder, then heat set.
- Stamp Wishing you on a piece of vellum and then die-cut it with Mandala die. Stamp "A wonderful day" on a piece of Rose Pearl Shimmering cardstock in Versamark and White embossing powder.
- Add a piece of Gold Glitter paper to card front. then add panel to card base with foam tape.
- Die-cut the little die from mandala set in coordinated pink cardstock and add them to card.
Products used:
or
Hope you like them!
Thanks so much for stopping by!
Thursday, April 13
I am guest designing for Concord & 9th!!
Hello everyone!! Today I have great news to share, I am an April Guest Designer for Concord & 9th! I will be sharing projects all month long and I hope you enjoy them as much as I am! This month's release is amazing, so amazing that some products are sold out!! I love their stamps since the very beginning, they are fun, unique and have a little something you don't see in other companies, that's why I love them!
Let me show you the projects I created using the Cuddles and Hugs Bundle, I had so much fun, I couldn't stop creating.
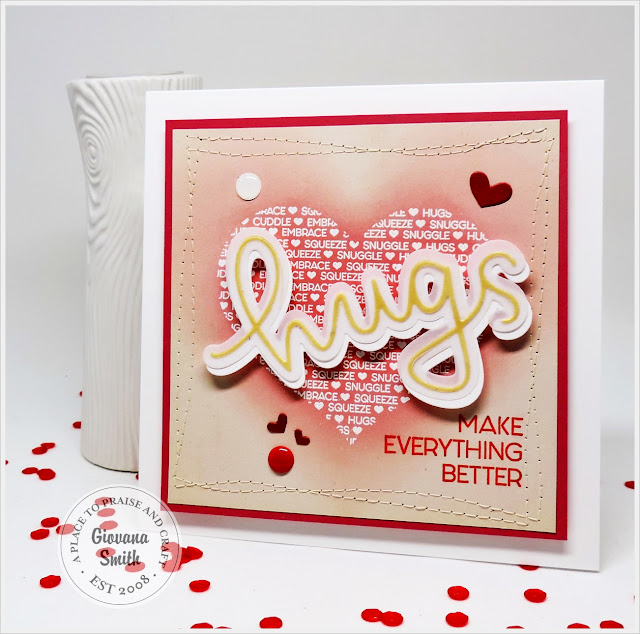
For this card I stamped the heart background on a piece of patterned paper in Versamark Watermark Ink, then added White embossing powder and heat set, after that I used a Spun Sugar Distress Ink just to highlight the heart and make it the focal point.After that I stamped the sentiment in red ink and die-cut the "hugs" work in white cardstock, vellum and gold vellum for the very detailed one, then adhered them all using the one from white cardstock a little offset to create a little border edge. Finally I added stitches and adhered the panel to a 6" square card base. To embellish it, I added the little heart from the heart die group.
===============
This card is super easy and was created in no time. Started with a A2 card base, sprayed pink shimmery mist, stamped the sentiment in black ink and die-cut the "hugs" in white and black cardstock, then adhered them to card, to make it easier I used Stick-It. Finally, added the die-cut heart group in red and few in pink.
================
Finally, this card is super bright and cheerful, the red metallic is a bit dark here, but it is a beautiful bright color (see the group picture). For this card I die-cut the "hugs" in white cardstock, I inked the outline die-cut with Golden Glitz Delicata ink, adhered them with Stick-it, sentiment was stamped in black ink and stitches were added to the top and bottom sides. More little heart were added from glittery red cardstock.
=================
Products used:
or
Hope you like them!!
I enjoyed creating these projects! Thanks so much Concord & 9th for giving the opportunity to guest design for you this month.
Have a fantastic day!
Monday, April 10
It's your birthday!
Hello everyone! Happy Monday to you all! Hope you all had a great weekend, I had a super fun Saturday with a friend, we went shopping {wink, wink} plus lots of laughs and laughs plus coffee, yesterday I did yard work and got really tired! I took a nap until almost 6 pm, so very thankful and grateful my daughter cooked dinner.
Anyway, let me show you a super cool and easy to put together card using the Birthday Party Collection from Crafter's Companion.
This is a 6"x 6" card, the papers are from Birthday Party Pad, I created a simple background just shaking Sparkle markers, then die-cut the balloons in Yellow Pearl Shimmering cardstock and added a cut out sentiment from the Scrapbook Paper Pad.
Entering this card to Simon Says Wednesday Challenge "Happy Birthday"
Hope you like it.
Have a fantastic day!!
Friday, April 7
My Sweet Petunia and Power Poppy Product Swap
Hello friends!! Welcome back to another fun collaboration blog hop between the My Sweet Petunia and Power Poppy teams!!
Leave a comment on each blog for your chance to win a MISTI (Winner's choice of an Original or a Mini) from My Sweet Petunia or (2) $25 gift certificates from Power Poppy by Marcella Hawley.
The Misti winner will be announced on the My Sweet Petunia blog on April 14th.
Power Poppy winners will be announced on the Power Poppy blog on April 14 th.
Let me show the project I created for you today, the image is from Peony Muse set and sentiment is from Natural Beauties Stamp set
First, using my Original MISTI I stamped the bigger peony in Versamark Watermark ink, applied White Embossing powder and heat set,
Then, I masked the embossed image and stamped the middle peony and leaves.
Finally, I masked the flower and stamped and added more leaves to the image.
The images were colored with Spectrum Aqua Markers, I colored them using soft colors and I like the feminine and cool look.
Another look of the card, I added stitches all around the image and the old fashion Stickles on the center of the flowers. I was quite surprise that I didn't use dies for this project, like the old fashion days {wink, wink}
Here is the blog hop list:
Have fun hopping.
Hope you like my card.
Don't forget to leave a comment ;)
PS: Don't forget to check another collaboration blog hop between My Sweet Petunia and Joy Clair HERE, another chance to win ;)
Wednesday, April 5
My Sweet Petunia and Joy Clair Swap Blog Hop
Hello friends!! I am so excited to be joining my first blog hop with My Sweet Petunia, this time we are joining forces with Joy Clair Stamps.
Leave a comment on each blog for your chance to win a MISTI (Winner's choice of an Original or a Mini) from My Sweet Petunia or (2) $25 gift certificates from Joy Clair Stamps!!
The MISTI winner will be announced on the My Sweet Petunia Blog on April 14th.
Let me show the projects I created for you today.
For my first project I used my Original MISTI and Creative Corners to stamp the image from Doodle Flower Background, I used Memento London Fog ink and Spectrum Noir Markers to color it. Then, I stamped the sentiment from Butterfly Kisses Stamp set on a piece of vellum. I added a piece of Red Metallic Cardstock behind the colored piece and added stitiches. Card base is A2 size.
For my second project I used this beautiful Butterfly Kisses Stamp set, the image was stamped using my Original MISTI on a piece of Watercolor paper in Versamark Ink, then added white embossing powder and heat set. Then, I used Color Burst to create the embossing resist coloring, easy and fun technique! I used Chartreuse, Violet and Tangerine Color BurstPowders. I aded zig-zag stitches and a layer of gold cardstock under the image. The card base is orange and card size is A2.
Blog Hop List:
Have a fantastic day!
Monday, April 3
"Hello" Shaker Card.
Hello friends! Hope you all are starting a fantastic week. Today, I have a super fun card to show you, I made a shaker card!
For this card I used the Louise Card Base dies, these dies are super fun, they die-cut beautifully leaving one side uncut in order to create your card base.
I stamped the hibiscus from Wild Rose & Hibiscus Stamp Set on a piece of White Premium Cardstock in Memento Tuxedo Black, then colored the images with Spectrum Noir Illustrator Markers: FS8, FS3, PP4, PP5, AP3, PO2, LG1, DG2, YG2, CR11, OR2.
I die-cut the stamped image using the Louise dies and then cutting the sides in order to create the window and main panel.
The sentiment is from the new Foil Transfer Kit.
Entering this card to:
Hope you like it.
Have a fantastic day!
Subscribe to:
Posts (Atom)


